Introduction
Laying tile is only half the job. Skip or rush the finishing steps, and you'll end up with cracked grout lines, stained joints, or a floor that looks tired within a year.
Many DIYers, and even some contractors, treat grouting and sealing as an afterthought. That's where the real durability of a tile floor gets decided.
Manufacturer data backs this up: most tile installations can be grouted after just 24 hours, though the exact window depends on the setting material used, according to MAPEI's installation guidance.
Rush that timeline, and grout can crack or trap moisture beneath the surface.
This guide walks through the exact process for finishing a tile floor: grout selection, curing, sealing or coating, plus how to pick a finish that actually matches how the room gets used.
Key Takeaways
- Finishing a tile floor requires cleaning, grouting, curing, and sealing to protect it long-term
- Matte and textured finishes suit floors, while glossy finishes work better on walls
- Cure time and sealant choice determine how long your floor actually holds up
- Ceramic coating systems can replace repeated wax stripping cycles, cutting long-term maintenance time
How to Finish a Tile Floor: Step-by-Step Guide
Step 1: Clean and Prepare the Tile Surface
Before grout touches the joints, the tile itself needs to be ready. Remove spacers, sweep away dust and debris, and confirm the thin-set or mortar has cured per the manufacturer's technical data sheet, typically 24-48 hours.
Check joint width for consistency, and clear any excess mortar sitting in the joints. Grout needs an open, uniform channel to bond properly.
Basic tools you'll need:
- Sponge and bucket for cleanup
- Rubber grout float
- Painter's tape to protect edges and fixtures
- Shop vacuum or soft broom for debris
Step 2: Apply Grout to the Joints
Mix grout to a peanut-butter consistency (not soupy, not crumbly) and spread it diagonally across the joints with a rubber float. Work in small sections so it doesn't skin over before you pack it in.
Grout type depends on two things: joint width and location.
- Unsanded grout: best for narrow joints, roughly 1/16 to 1/8 inch
- Sanded grout: built for wider joints, up to about 1/2 inch
- Epoxy grout: chemical- and stain-resistant, suited to wet areas, commercial kitchens, and other high-exposure spaces
Wear gloves and work in a ventilated space. Cementitious grout dust can irritate skin and lungs, and epoxy products carry their own handling requirements listed on the safety data sheet.
Step 3: Clean Excess Grout and Allow Proper Curing
Once the grout firms up, usually within 15-30 minutes, wipe the haze off the tile face with a damp sponge. Don't oversaturate. Too much water weakens the joint and can leave a cloudy film behind. Once the haze fully forms, buff it off with a dry cloth.
From there, curing has multiple checkpoints, not just one:
- Foot traffic: often safe within a few hours for fast-setting products
- Routine cleaning: typically fine after 24 hours
- Sealing: most manufacturers call for 24-72 hours
- Heavy use or immersion: can require 72 hours or more
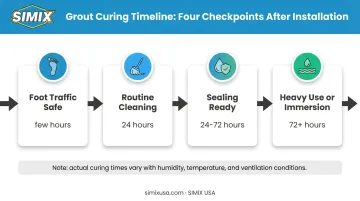
Humidity and temperature push these numbers around. Cooler, damper rooms slow curing; warm, dry conditions speed it up. Rushing any of these steps is the single most common cause of cracked or powdery grout lines.
Step 4: Seal or Coat the Tile and Grout for Long-Term Protection
Once the grout has cured, it's time to lock in that work. Sealers fall into two camps:
- Penetrating sealers soak into the pores of tile and grout, repelling stains without changing the surface look
- Topical sealers sit on top, forming a film that adds sheen but wears down with foot traffic
Traditional sealers, whether penetrating or topical, typically need reapplication every one to three years depending on traffic and product.
That reapplication cycle is exactly what pushed SIMIX to build its ceramic coating and cleaner system as an alternative. Instead of a temporary film, the SIMIX Multi-Surface Ceramic Clearcoat bonds into the surface, forming a hardened, non-toxic layer that resists stains and wear.
Unlike traditional sealers, it skips the repeated stripping and reapplication cycle. It's also water-based and zero-VOC, which matters if you're coating indoors without heavy ventilation.
Application follows the same logic as any coating: apply a thin, even layer with an applicator pad, then let it cure fully per the product's instructions before foot traffic resumes.
Run a small test patch first. Cure times and coverage can shift with tile porosity and room conditions, so check the specific instruction sheet rather than guessing.
What You Need Before Finishing a Tile Floor
Materials and Tools Checklist
Beyond a float and sponge, a handful of items make finishing go smoother:
- Grout (sanded, unsanded, or epoxy, matched to joint width and location)
- Grout float and mixing paddle
- Sponges and two buckets (one for clean water, one for rinsing)
- Sealant or ceramic coating system, such as SIMIX Multi-Surface Ceramic Clearcoat, a zero-VOC option rated for both porcelain and natural stone
- Applicator pad
- Protective gloves and eye protection
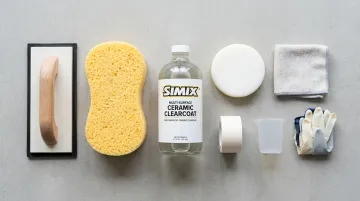
Compatibility matters as much as the tool list. Porcelain is dense and low-porosity, so it accepts most sealers without much absorption. Natural stone — marble, travertine, slate — is far more porous and often needs a dedicated stone sealer or a coating rated for that substrate.
Skill, Safety, and Timing Readiness
Grouting doesn't demand advanced skill. Most homeowners can handle a small bathroom or kitchen floor over a weekend. What trips people up is timing and safety.
- Work in a ventilated room, especially with cementitious grout dust or chemical-based sealers
- Wear gloves, and for larger jobs, a dust mask
- Watch temperature and humidity — both shift cure times significantly
- Build in buffer days before sealing; don't schedule furniture delivery the same week
Types of Tile Finishes: Choosing the Right Look for Your Floor
Matte and Textured Finishes
Matte tile has a smooth, non-reflective surface that hides smudges, water spots, and foot traffic marks better than any glossy option. It's a practical pick for kitchens, entryways, and other high-traffic floors.
Textured finishes go a step further, recreating the grip of natural stone or concrete. They're the go-to for outdoor patios, bathroom floors, and anywhere water pools underfoot.
Glossy, Polished, Honed, and Satin Finishes
Glossy and polished tile amplify light and pattern, which looks striking on a wall or in a low-traffic formal space. On a floor, that same shine becomes a liability. Polished surfaces lose traction fast when wet, and finish name alone doesn't guarantee safe footing.
Honed and satin finishes split the difference: a soft, low-sheen surface that's easier to maintain than full polish but still reads as elegant. They've become popular for floors that want understated sophistication without matte's flatness.
Which Finish Is Best & Emerging Trends
The "best" finish depends on the room. For floors, matte or textured wins almost every time, offering better grip and easier upkeep, with far fewer visible smudges. Save glossy and polished for backsplashes, accent walls, or spaces with light foot traffic. A ceramic coating like SIMIX's Multi-Surface Ceramic Clearcoat can boost slip resistance on polished tile without dulling the shine.
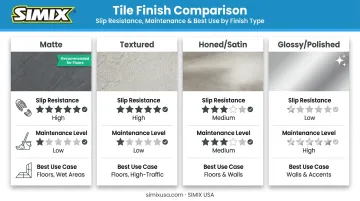
One number worth knowing: ANSI A137.1 sets a minimum wet DCOF (dynamic coefficient of friction) of 0.42 for interior floors expected to get wet. The Tile Council of North America notes that DCOF alone doesn't guarantee slip safety, so always check a tile's rated use before installing it underfoot.
On trends: large-format matte porcelain and textured concrete-look tile have taken over showroom floors the past two years. Coverings' 2024 trend report named concrete-effect porcelain and tactile, dimensional surfaces among its top design directions: floors that look industrial but feel warmer underfoot than actual poured concrete.
Common Mistakes and Troubleshooting When Finishing a Tile Floor
Even careful installers hit snags. Here's what causes most tile finishing failures:
- Skipping cure time: Grouting or sealing too early traps moisture and weakens joints, leading to cracks within months rather than years
- Wrong grout or sealant for the material: Using a cement-based sealer on natural stone, or skipping epoxy in a shower, often causes discoloration or premature wear
- Over-wetting during cleanup: Too much water while wiping haze leaves cloudy residue or washes color out of the grout
- Uneven sealant application: Applying sealer too thick in spots causes streaking and uneven curing
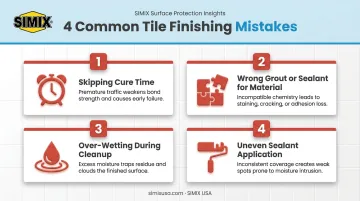
There's also a maintenance mistake that shows up months later: leaning on harsh chemical strippers to keep floors shiny. Repeated stripping cycles wear down tile finish over time and add hours of labor every quarter.
Facility teams managing tile floors on a strip-and-wax cycle often switch to a ceramic coating system, such as SIMIX's, to skip that repeated labor. The coating is built to hold up without stripping, cutting maintenance time significantly.
DIY vs. Hiring a Professional for Tile Floor Finishing
For a small bathroom or kitchen floor, DIY finishing is entirely doable. Standard grout, a basic sealer, and a Saturday afternoon cover most residential jobs.
Hiring a professional makes more sense when:
- The floor is large or commercial-scale, where consistency across hundreds of square feet matters
- Natural stone is involved and needs a specialized sealer matched to its porosity
- The tile pattern is intricate, with tight joints or mixed materials that complicate grout selection
Commercial and institutional facilities, including schools, hospitals, and retail chains, often skip DIY sealers in favor of professional-grade coating systems. Durability and compliance matter more than upfront cost, and a coating that eliminates repeated stripping pays for itself in labor savings.
SIMIX's Cleaner + Clearcoat Combo reflects that approach. It pairs a peroxide-based cleaner with a ceramic clearcoat, letting facility teams handle prep and protection in one system instead of juggling multiple products.
Frequently Asked Questions
What are the different finishes of tile floors?
Tile finishes range from matte and textured to glossy, polished, honed, and satin. Matte and textured options offer the best grip and lowest maintenance, while glossy and polished finishes prioritize shine over slip resistance.
Which tile finish is best?
It depends on the room. Matte or textured finishes work best for floors because they handle traffic and moisture better, while polished or glossy suits walls and accents where slip resistance matters less.
What is the new trend in flooring tiles?
Large-format matte porcelain and textured concrete-look tile are leading current design trends, per Coverings' 2024 trend report. These styles pair an industrial look with better slip resistance than polished alternatives.
How long should grout cure before sealing a tile floor?
Most manufacturers recommend 24-72 hours before sealing, though this depends heavily on the specific grout product, humidity, and room temperature. Always check the technical data sheet for exact timing.
Can you finish a tile floor without sealing it?
You can skip sealing, but unsealed grout and porous tile stay vulnerable to staining, moisture absorption, and mold growth. Sealing or coating is the step that actually protects your grouting work long-term.
How often should you reseal or recoat a tile floor?
Traditional sealers typically need reapplication every one to three years, depending on traffic and product. Ceramic coating systems, including SIMIX's, are designed as a one-time application that can last 5-10 years without stripping or recoating.