But cleaning coils "correctly" is harder than it sounds. Results vary wildly based on coil type, chemical selection, water pressure, and the technician's technique. A rushed job can leave interior rows caked with debris while the outer fins look spotless.
This guide walks through the exact step-by-step process, when cleaning is actually needed, the variables that determine whether a job succeeds or fails, the mistakes that waste time and money, and how to extend results long after the crew packs up.
Key Takeaways
- Clean coils annually under normal conditions, monthly in coastal or high-fouling areas.
- Alkaline, non-acidic cleaners protect coil metal; acid-based formulas corrode fins and harm workers.
- Split multi-row condenser coils apart; surface cleaning alone misses interior fouling.
- Ceramic coating after cleaning extends service intervals and cuts energy use further.
How to Clean Commercial HVAC Coils: Step-by-Step Process
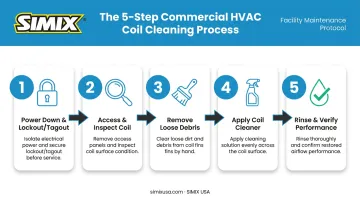
Step 1: Power Down and Secure the Unit
Shut off power at the electrical disconnect and apply lockout/tagout before touching the coil. Under OSHA 29 CFR 1910.147, cleaning qualifies as "servicing," meaning the standard's full lockout requirements apply, not just a quick flip of the switch.
Before starting work:
- Identify every energy source (electrical, stored, mechanical) and isolate each one
- Verify zero energy state before proceeding
- Wear gloves and goggles at minimum
- Shield motors, contactors, and control boards from moisture and chemical overspray
Skipping this step is the fastest way to turn a routine cleaning job into an injury report.
Step 2: Access and Inspect the Coil
Remove access panels or grilles to expose the coil face. For multi-row commercial condenser coils, this often means detaching fans and splitting the coil banks apart to reach interior sections.
Many commercial units are specifically designed to separate for this purpose. Use temporary supports so the loosened bank doesn't sag or stress refrigerant lines.
Once open, inspect for:
- Bent or crushed fins
- Corrosion or pitting on tubes and fins
- Heavy debris packed between rows
Straighten any bent fins with a fin comb before applying cleaner. Cleaning over damaged fins just traps more debris in the gaps.
Step 3: Remove Loose Debris
Vacuum or brush away leaves, dust, and coarse material like cottonwood fuzz before any chemical touches the coil. Skip this step and that loose debris mixes with cleaner to form a paste that's far harder to rinse out than the original dirt.
A soft-bristle brush works parallel to the fins, never across them, to avoid bending delicate aluminum edges.
Step 4: Apply the Coil Cleaner
Select a non-acidic, alkaline or surfactant-based cleaner matched to the coil type. Condenser coils generally need a wet-cleaning product with a full rinse step; evaporator coils sometimes use no-rinse formulas where condensate carries residue away.
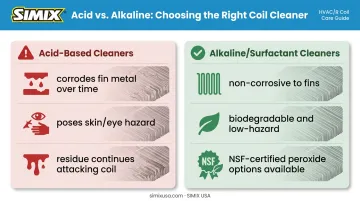
Acid-based cleaners are common in the field, but they carry real trade-offs:
- They strip metal from fins over repeated use, weakening the coil structure
- They pose direct skin and eye hazards to technicians
- Residue left behind (above roughly 10 ppm halogens) can keep attacking coil metal even after the job is done
NSF-certified, peroxide-based cleaners (such as SIMIX's Multi-Surface Peroxide Cleaner & Degreaser) offer a non-toxic alternative that lifts grease, biofilm, and grime without the corrosive risk of harsh acid formulas.
Apply according to label instructions, and give the product adequate dwell time to penetrate embedded dirt lodged between fin rows before rinsing.
Step 5: Rinse and Verify Performance
Rinse with high flow at low pressure, keeping the water stream parallel to the fins rather than crossing them at an angle.
ACHR News trade guidance recommends directing the first pass from the leaving-air side toward the entering-air side, pushing debris back out the way it came in, then washing down the exterior.
There's no universal psi figure that applies to every coil — always check the specific unit manufacturer's service literature before pressure washing.
Once rinsed:
- Reassemble split coil banks and reinstall panels
- Restore power and confirm normal startup
- Check pressure drop or temperature differential against the coil's design specs to confirm the cleaning actually restored performance
When to Clean and What You Need Before You Start
Timing and preparation determine whether a cleaning job actually pays off — or just moves dirt around.
Signs Your Coils Need Cleaning
Watch for these indicators before scheduling service:
- Rising energy bills with no other explanation
- Reduced cooling capacity or longer run times to hit setpoint
- Abnormal head or suction pressure readings on the refrigerant circuit
- Visible dirt, grease film, or debris buildup on the coil face
- Ice forming on evaporator coils, often a sign of restricted airflow
How Often to Clean Commercial HVAC Coils
Frequency depends entirely on exposure. The DOE's Operations & Maintenance Best Practices Guide notes that outdoor coils in particularly dirty environments may need cleaning two to three times per cooling season rather than once.
| Environment | Recommended Frequency |
|---|---|
| Normal rooftop condenser, low dust | Once per year |
| High dust, soot, or cottonwood exposure | Two to three times per year |
| Continuous-cooling applications (data centers) | Semiannual minimum |
| Coastal or severely corrosive atmospheres | Monthly to quarterly |
Facility-wide energy-focused maintenance programs, of which coil cleaning is one component, can deliver 5% to 20% savings on total facility energy bills, according to the same DOE guide.
Equipment, Materials and Safety Checklist
Once you've confirmed cleaning is due, assemble the right gear before the crew shows up. Confirm you have:
- Low-pressure sprayer or steam unit rated for coil work
- Soft-bristle brush and fin comb
- NSF-certified, non-acidic coil cleaner (SIMIX's peroxide-based Multi-Surface Cleaner & Degreaser is one option) and rinse water access
- Full PPE: gloves, goggles, and chemical-resistant clothing
- SDS reviewed for the specific cleaner being used
- Lockout/tagout devices and a confirmed isolation procedure
Key Parameters That Affect Commercial HVAC Coil Cleaning Results
Two crews using the same cleaner can get completely different results depending on how well they control these variables.
Water Pressure and Nozzle Angle
Excessive pressure or a crosswise nozzle angle bends delicate aluminum fins, which restricts airflow permanently — no amount of cleaning fixes crushed fins. The safest approach uses high flow at low pressure, with the stream kept parallel to the fin channels rather than blasted across them. No single psi number works for every coil; the manufacturer's service literature is the only reliable reference.
Cleaning Chemical Type (pH and Formulation)
Acid-based cleaners corrode coil metal and put technicians at risk of chemical burns. But alkaline doesn't automatically mean safe either: aggressive formulas in either category can strip metal if left too long or used at the wrong concentration.
Surfactant-based, biodegradable options that lift soil without attacking the base alloy tend to perform best. NSF-certified peroxide degreasers, like SIMIX's formula, fall into this safer category, formulated without acid or VOCs and requiring no special hazardous handling for the crew.
Coil Configuration: Single vs. Multi-Row
Multi-row coils trap debris behind the outer layer where a surface-level wash never reaches. Washing only the exposed face leaves the interior blockage completely intact, and the coil looks clean while still restricting airflow.
Splitting the coil banks apart is the only way to reach those hidden rows. Skip this step and you've done a cosmetic rinse, not a real cleaning.
Environmental Exposure
Salt air, acid rain, sulfur-bearing water, and decomposing organic matter all accelerate fouling. Salt deposits in particular don't rinse away with plain water; a cleaner is needed to break surface tension first. Coastal units, or those near fertilizer or livestock operations, need shorter cleaning intervals and benefit from added corrosion protection.
Common Mistakes and Troubleshooting Coil Cleaning Issues
Common Mistakes to Avoid
- Cleaning only the visible outer row and assuming a multi-row coil is fully serviced
- Using high water pressure or acid-based cleaners that bend fins or corrode metal
- Skipping lockout/tagout or soaking motors and electrical components during rinsing
- Rinsing too briefly, leaving chemical residue that continues attacking coil metal
SIMIX's peroxide-based Multi-Surface Cleaner avoids this fin damage and corrosion without harsh acids or high pressure.
Troubleshooting Common Coil Cleaning Problems
| Problem | Likely Cause | What to Check |
|---|---|---|
| High pressure drop persists after cleaning | Interior rows of a multi-row coil were never split apart and cleaned | Re-split the coil banks and inspect interior sections for residual buildup |
| Cleaner leaves residue or hazy film | Insufficient rinse time, or a cleaner incompatible with the coil material | Extend rinse duration; confirm the product is rated for that specific coil type |
Beyond Cleaning: Protecting Commercial HVAC Coils Long-Term
Cleaning restores performance, but unprotected coils re-foul fast — especially in coastal or high-dust environments where you might be back on the roof within weeks.
A ceramic coil coating creates a thin protective barrier that reduces dirt adhesion and corrosion, extending the time between cleanings.
SIMIX's 2-Step Cleaner & Ceramic Clearcoat system works this way: Step 1 deep-cleans coils with a peroxide-based degreaser, then Step 2 applies an ultra-thin ceramic layer engineered to stay thermally conductive rather than insulate, unlike traditional coatings.
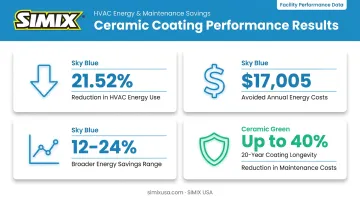
Documented results from American Leadership Academy in Gilbert, Arizona (a 59,300-square-foot campus running 44 Trane rooftop units totaling 215.5 tons) show what this looks like in practice:
- 21.52% reduction in HVAC energy use year over year
- $17,005 in avoided energy costs, tracked monthly across a full calendar year
- Achieved with zero equipment replacement
Broader performance data for the SIMIX HVAC system points to 12–24% energy savings and up to 40% reduction in maintenance costs, with coated coils rated for 20-year longevity.
Here's the trade-off worth weighing: relying on cleaning frequency alone means recurring labor and chemical costs stack up every quarter, indefinitely. A one-time ceramic coating investment extends the interval between services and lowers the total cost of ownership over the life of the equipment.
Frequently Asked Questions
How much does commercial HVAC coil cleaning cost?
Costs vary by unit tonnage, coil accessibility, and whether the work is done in-house or contracted out. Get a facility-specific quote rather than relying on generic online estimates, since commercial rooftop access alone can shift pricing by a wide margin.
How often should commercial HVAC coils be cleaned?
Annual cleaning works for units in low-dust environments. Facilities near coastlines, heavy dust, or continuous cooling loads should move to quarterly or even monthly service based on exposure severity.
Is commercial HVAC coil cleaning worth it?
Yes. Clean coils reduce energy consumption, lower compressor strain, and help equipment hit its designed operating life, avoiding the far higher cost of premature replacement.
What methods do HVAC technicians use to clean commercial HVAC coils?
Technicians use low-pressure washing or steam with alkaline, non-acidic foaming cleaners, splitting multi-row coil banks apart to reach interior sections that a surface rinse can't touch.
Can I clean HVAC coils myself, or do I need a professional?
Trained facility staff can handle basic single-row coil cleaning with proper PPE and lockout procedures. Complex multi-row or high-tonnage systems benefit from a professional service call.
How can I extend the time between commercial HVAC coil cleanings?
Protective ceramic coatings, like SIMIX's system, reduce dirt and microbial adhesion on coil surfaces. That means fewer cleanings over time and better heat transfer efficiency between services.